Monday, October 8, 2012

NAPA descriptions deeply

The following blog might be a bit too advanced for beginners. However, if users are wondering how NAPA db looks like there is a way how to look into it. By "looking into" any object in NAPA dbs you can basically access absolutely whatever data (even the one not "officially" accessible in other ways).

So what's the trick? Of course few commands. Here they are:
!MAP
and
!DML

!MAP command is showing the content of the memory. It means it's showing all "descriptions", which are accessible at the moment in runtime memory. All these objects are flagged by so-called reference number. It's an id, which is used for handling of "descriptions".

!DML command is used for listing (showing) the "description" from the memory on the screen (into NAPA main window).

Note: If the "description" is not yet in the memory, you can easily make it accessible by DB.READ service function (or DB calculator command).

Probably the most straight forward way to show the functionality is to make an example:
E.g. you are wondering how the NAPA setup is stored in the system.


  • Let's make a setup called SET1 like this: SET,  Z=0.9, Z=5, Z=8, PROF
  • Get it into the runtime memory (rn is variable containing the reference number): @rn=DB.READ('SETUP*SET1','-',1,'-','E')
  • Now use !MAP command to see all descriptions in the memory: !MAP
     ******** DESCRIPTIONS IN MEMORY ******** 
     name                      type        date      refnr  nrec   nwords
     SETUP*SET1                   0  1539119694      22022     1       10
  • In my case the reference number is 22022. Now we can have a look at the record in NAPA db of our setup: !DML 22022
 *******************DESCRIPTION LISTING*******************

 SETUP*SET1                  TYPE:       0 DATE:   1539119694

 LISTING OF RECORD     2000   TYPE:   3   SIZE:    2
     1     SET
     2     Z=0.9, Z=5, Z=8, PROF

 *******************END OF DESCRIPTION LISTING*******************

As you can see it's not any surprise, but this is only simple example. It's much more interesting on tables or loading conditions. Someone can now ask how to access these data. For this purpose there is a calculator command REC.
@array=REC(22022,2000)
!VAR LIS array
SET                   Z=0.9, Z=5, Z=8, PROF
!CAL array(2)
Z=0.9, Z=5, Z=8, PROF

As you can see from above, NAPA dbs are storing data in relatively simple way using sets of arrays. Each object (description) is matrix (vector of vectors/2D array), while descriptions are flagged by reference number and each array is flagged by so-called record number (2000 in example above). It is not always 100% clear what all "records" are containing - this is NAPA company know-how, but in many cases it is really easy to understand just by looking at the examples.

Friday, June 10, 2011

HOW TO : Panic exit in NAPA

"Panic Exit" error message is well known for all NAPA users. If I'm not wrong they've changed it in 2008 release into something like this :
Now you maybe ask yourself how long I had to wait to write this post until I managed to get the message. Answer : Not much :o)
Following procedure was tested on NAPA rel. 2010.2-3 and also 2010.2-4 but feel free to test it on other releases as well.
  1. Start NAPA
  2. Open project (e.g. use PRO command)
  3. In main window menu go to TASK->LOADING CONDITIONS->LOADING CONDITIONS
  4. Use open button or FILE->OPEN
  5. And now type name of existing loading condition, in my case L30
  6. In upper left corner click by mouse on either Detailed list or Properties list
  7. And afterwords click on another loading condition than you've typed before
  8. there you go - Panic Exit - enjoy
Let me some complains. It's a bit odd, that NAPA has quite high price+maintenance and at the same time the focus is not on already existing basic tools but on building new ones. Or maybe by other words, there was no improvement of text editor for years, but every year there is some "new" and "fancy" manager application. Another think is, that NAPA guys develops only the features which are asked by rich customers with high number of licenses. Other users has probably only bad ideas about NAPA.

Sunday, October 10, 2010

Simple but useful command

This blog will be very short. It will describe a command which you can use for searching in macros (DATA*) or eventually lists (LIST*) for a string. The result of command is list of macros, which contains the string you search for. This is very useful in case you are searching for some example of some command e.g. in NAPAdb. Of course, there are many other possible purposes. Difficult part of the command is syntax and proper form of apostrophes. Below is self-explaining example :
@list=ARR(3)
@AD.SELECT(7,'DATA*',list,'','','LOC<''searched_string''')
!var lis list

Saturday, October 9, 2010

Dell Precision M4500

I just got in my hands new laptop Dell Precision M4500. It is quite new model from Dell and I'm going to describe you some issues during getting Linux on it.

So I've downloaded my favorite Linux distribution Mandriva 2010.1 in its latest release. After installation and first restart I got blank (black) screen already during booting. Of course, the problem was with video card NVIDIA FX1800M and it's drivers. Than I had to start system into safe mode - command line interface.
In order to be able to install proprietary deriver from NVIDIA, it is necessary to install following packages : binutils, gcc, make, kernel-source, kernel-server-devel.
code :
su (+enter password)
urpmi --auto-update
urpmi binutils --auto-select
etc.
sh ./NVIDIA-LINUX-x86-....(use name of your driver)
Installer will guide you through the installation and after restart you should be able to start system normally. Note : if you need to uninstall some package use command urpme.

Next issue was to get working my wireless : Broadcom Corporation Device 4353 (rev 01). To find out what wireless card (+other devices) you have, you can use command lspci -nn. Do not install broadcom-wl driver, it wont work. The only way I get it working was by ndiswrapper. So go to Mandriva Control Center->Install&Remove software and install ndiswrapper. Than go to Network & Internet tab->Set up a new network interface->Wirelelss->Use a Windows driver (with ndiswrapper )->pick up file with windows driver. You should download a windows driver unpack it and find files bcmwl5.inf and bcmwl5.sys. After all this steps, you can finally configure your wireless as usually.

Let's fix the last issue...Microphone is not working neither with pulse audio neither with alsa. First I've disabled pulse audio in Mandriva Control Center->Hardware->Sound configuration->uncheck "Enable pulse audio" :
Than open console, login as root "su" (+enter password). Open e.g. midnight commander by command "mc" and go to following folder : /etc/modprobe.d/ . Create a new file there with name alsa-base.conf and insert into it following line : options snd-hda-intel model=dell-s14. Restart computer and now microphone should work. Of course also open mixer and check if the channels are not muted or too low volume.

Overall I'm quite happy with this laptop, but once again was proved, that new hardware is not well supported by Linux. I have this experience on all my laptops. All the issues was solved "out of box" later, based on users experiences and debugging. Hopefully this blog will  be useful for others as well. Let me know by mail in case of some comments or questions.

Saturday, June 20, 2009

Customizing of environment - part 1

The name of this post is covering quite extensive part of NAPA and many issues. We can customize more less everything in NAPA. Sounds amazing?
So lets make a list from top of my head what you can customize :


  • resources of NAPA - it means, that you can change color, fonts, sizes of different "building blocks" of environment. e.g. color of text windows, hight of text in whole environment, the color of windows ....

  • additional buttons - you can add new buttons in all NAPA windows below main toolbars, but you can also add menu items in your current menu (I know how to do it at least in main window)

  • change default icons to something you like more or you can create your own

  • windows and tools as new widgets - this option is giving almost whatever possibilities and of course you can create your own NAPA tools

  • managers - this is the most common and official way of NAPA customization

In this post I'll start with adjusting of so called resources/resource files. Below is an example of two versions of resource files.


The first screenshot represents default theme and the second my own settings. I made 4 different settings.

  1. Background color

  2. Foreground color

  3. Text background color

  4. Size of the text

If you want to do the same you have to save a text file of this shape :

napa*background : Dimgray
napa*foreground: White
napa*XmText.background: Darkgray
!ADD RES*SMALLLAYOUT


And save this as either RES*your_user_ID or RES*SYSTEM into database SYSDB (DB2). The first form is for customizing of your own run of NAPA and the second is for all users.

Saturday, May 30, 2009

My current Linux distribution

Right now, I'm getting more and more experiences with my Mandriva 2009.1 Spring distribution. In this post I would like to point some advantages of this distribution.

I have to make a conclusion at the beginning of the post. :o)
I love it.
It is the best distribution I've ever tried. Anyway, I'm impressed by it's features and abilities. I'm not a typical Linux user - I don't want to set up/install everything by command row. I just like the clicking tools and to have all the options summarized in nice GUI (graphical user interface). This is what new Mandriva offered to me. Let's go through some steps I made on my installation.
  1. Installation itself was easy and intuitive. I was installing on external USB HDD. If you install also on a system with other OS or not to a primary hard drive you have to be careful with choosing proper partition for installation and also with writing of boot-loader. I made all settings by myself - it is not that difficult.
  2. The next step was fixing some hardware drivers. The first one was wireless. I have on my laptop Intel PRO/Wireless 3945ABG adapter. I opened Mandriva Control centre and choosed "Browse and configure hardware". After clicking on Ethernetcard->RO/Wireless 3945ABG->Run config tool system informed me that I need to download driver for Intel website. I was following the instructions and in a minute I got running wireless connection. I used similar procedure for setting up a drive for my NVidia G72GL (Quadro FX 350M) video adapter. After pressing "Rung config tool" on my video adapter I've choosed "GeForce FX series" instead of default "GeForce 6100 and later". Mandriva downloaded drivers and installed new drivers. After logging out and in I got support for desktop effects as well. Very important issue which I solved was to disable "Pulse audio". You can do it in Mandriva Control centre->Sound configuration by un-ticking "Enable PulseAudio". This made my Skype working 100% correct reg. sound input/output. I have Intel Corporation|82801G (ICH7 Family) High Definition Audio Controller.
  3. I had to set up also installation sources which I made following the guidelines from Mandriva website. It is important to set up "Non-free" and "PLF" sources. There you can find codecs and many other software/libraries/tools which can't be placed in Official Mandriva surces.
  4. Next step was of course installing of codecs, Mplayer,VLC player, Skype,unrar, pdf editor, StarDict, Adobe flash player (directly from their web page). I think, that very important step was to uninstall totem-plugin for Mozilla and instead install Mplayer-plugin for Mozilla, which much better. I've installed also JAVA under java-1.6.0-openjdk package name. I've played a lot with changing of colours/themes. The best docker (I think) is the kiba dock. It's easy to use and set up. It's small and it just works. You have to allow desktop effects to get a proper behaviour of Kiba dock - but this is common for most of the dockers I've tried.
  5. What I like very much on Mandriva?
  • really quick boot and turning of the computer
  • nice and stable KDE 4.2.2
  • I think it is one of the most user friendly GUI focused Linux distribution
  • large community and repositories
  • until now I didn't find any bug
  • it contain most of the newst software (Open Office, Mozilla and much much more)
  • you can change the icon on "Start" (menu) button by GUI tool. This is the first OS where I found this option!!!! I love it.....:o)
  • it works as you expect
So, I can only recommend to try Mandriva 2009.1 Spring Linux distribution as my best candidate.

Thursday, May 14, 2009

First steps with NAPA

My second post will be about basic NAPA initial environment/settings. And my personal opinion about GUI and software itself. I'll not describe the installation process - it is fully described in installation manual with screenshots on every steps. I was installing NAPA many times both stand alone and server version. It's no problem - like any other windows application, you don't have to be IT specialist to do it.

Before first run of NAPA is good to make settings of EXCEED. What is it? It's an UNIX system emulator, which means that you can run UNIX based software under Microsoft Windows. Exceed and Exceed 3D is recommanded to install befor installation of NAPA itself. I have to say, that for me is very supprising, that NAPA is right now supported only on MS Windows platform running under emulater - EXCEED. It is like running e.g. MS Office under Linux via Wine emulator (translation layer).

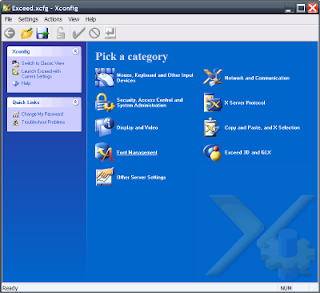
Back to Exceed setting. Start "Xconfig" from Start->Programs->Hummingbird Connectivity V8.0->Exceed.
Here is the list of settings I use to make after installation of Exceed + NAPA :
  1. Mouse, Keyboard and Other Input Devices - here you can choose which keyboard layout you use. More important is tab "Mouse Input". There you can set up the actions for mouse wheel movement. Choose "Wheel movement invokes macro" option. Than click on button "Macro Bindings". In next window click on button next to Wheel: and Up: items. Press Add, fill the name of macro e.g. UP and press "Start Record". After this step be care full, because whatever you press know will be recorded as "UP" macro. Know, press once up arrow on keyboard and immediately after that press "Stop Record". Than press OK. In "Macro selector window" assign just created macro to Wheel: Up: action. In "Mouse Wheel Macro Bindings" window you can set up together 4 options for mouse wheel in combination with some keys. Repeat the procedure mentioned above once again, but this time Wheel: Down: and during macro recording press down arrow. When you finished Mouse, Keyboard settings press OK and green tick for validation in main window.

  2. Display end Video - in this section just go to "Common Settings" tab and there put ticks for "Enable Server Reset" and "Exit Server Reset". Remove ticks from "Close Warning on Exit" and "Hide X Server Menu Items" if there are some. Again you have to validate the settings by clicking on green tick. This settings will cause, that you will not get disturbing messages when closing NAPA windows by clicking of "close" button on top of the window.

  3. Copy and Paste, and X Selection - very important is to set Copy/Paste. If you want to be able to use Copy/Paste between NAPA and all other windows applications you have to choose "CLIPBOARD" in selection window. Validate again the setting by green tick.

Now you can start NAPA. The first time you'll get login window, type "ADMI" as User Id without any password. ADMI user is the first initial and the only user just after installation. You can administrate your accounts, users and passwords later directly in NAPA. The basic NAPA window after start you can see on next screenshot :

Let's continue next time with some more interesting settings like customization of NAPA start and GUI. You will be maybe surprised how much you can do during the start process.

Let me know in comments abut which part of NAPA you would like to read next time.