Before first run of NAPA is good to make settings of EXCEED. What is it? It's an UNIX system emulator, which means that you can run UNIX based software under Microsoft Windows. Exceed and Exceed 3D is recommanded to install befor installation of NAPA itself. I have to say, that for me is very supprising, that NAPA is right now supported only on MS Windows platform running under emulater - EXCEED. It is like running e.g. MS Office under Linux via Wine emulator (translation layer).
Back to Exceed setting. Start "Xconfig" from Start->Programs->Hummingbird Connectivity V8.0->Exceed.
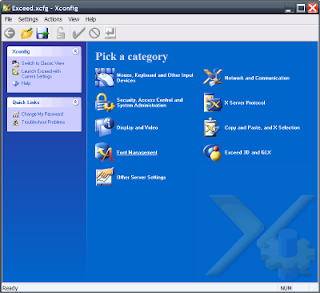 Here is the list of settings I use to make after installation of Exceed + NAPA :
- Mouse, Keyboard and Other Input Devices - here you can choose which keyboard layout you use. More important is tab "Mouse Input". There you can set up the actions for mouse wheel movement. Choose "Wheel movement invokes macro" option. Than click on button "Macro Bindings". In next window click on button next to Wheel: and Up: items. Press Add, fill the name of macro e.g. UP and press "Start Record". After this step be care full, because whatever you press know will be recorded as "UP" macro. Know, press once up arrow on keyboard and immediately after that press "Stop Record". Than press OK. In "Macro selector window" assign just created macro to Wheel: Up: action. In "Mouse Wheel Macro Bindings" window you can set up together 4 options for mouse wheel in combination with some keys. Repeat the procedure mentioned above once again, but this time Wheel: Down: and during macro recording press down arrow.
 When you finished Mouse, Keyboard settings press OK and green tick for validation in main window.
 - Display end Video - in this section just go to "Common Settings" tab and there put ticks for "Enable Server Reset" and "Exit Server Reset". Remove ticks from "Close Warning on Exit" and "Hide X Server Menu Items" if there are some. Again you have to validate the settings by clicking on green tick. This settings will cause, that you will not get disturbing messages when closing NAPA windows by clicking of "close" button on top of the window.
- Copy and Paste, and X Selection - very important is to set Copy/Paste. If you want to be able to use Copy/Paste between NAPA and all other windows applications you have to choose "CLIPBOARD" in selection window. Validate again the setting by green tick.
Now you can start NAPA. The first time you'll get login window, type "ADMI" as User Id without any password. ADMI user is the first initial and the only user just after installation. You can administrate your accounts, users and passwords later directly in NAPA. The basic NAPA window after start you can see on next screenshot :
 Let's continue next time with some more interesting settings like customization of NAPA start and GUI. You will be maybe surprised how much you can do during the start process.
Let me know in comments abut which part of NAPA you would like to read next time.
i need license of it for 2009 version
ReplyDeleteplease help
i cannt use this software since sysdb.db and iof files was not founded.
ReplyDeleteThat's strange, because this is part of the normal installation. Was your installation without problems? I might help you, but post here some more details reg. your case.
ReplyDeletei've found and solved it.
ReplyDeletethanks...:-)